
Preview



Description
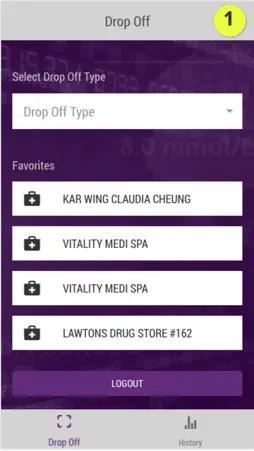
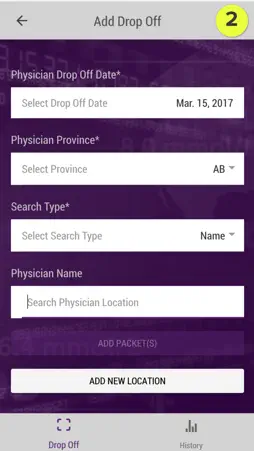
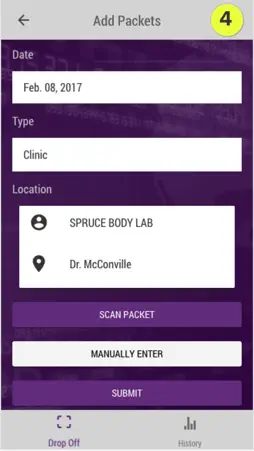
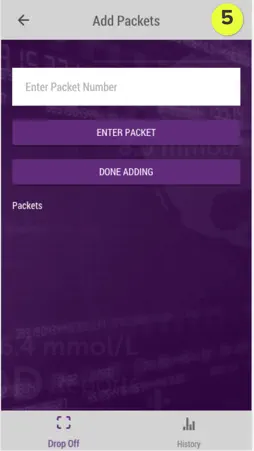
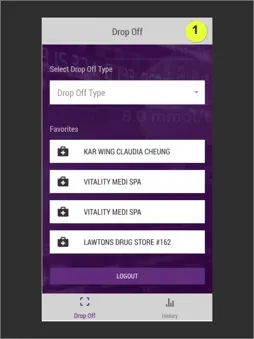
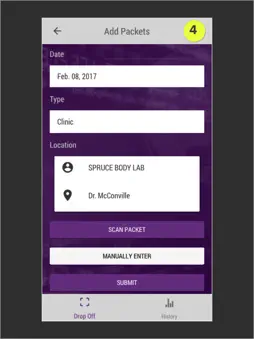
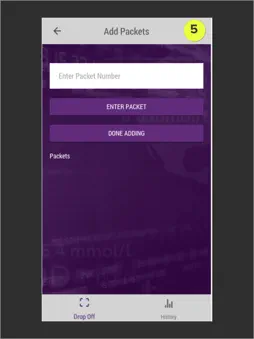
IMIR Scanner App User Guide Welcome to the IMIR Scanner App. To get started, use your STI Data Solutions login credentials to log into the app. 1. SELECT DROP OFF TYPE: To select drop off type, tap on the Drop Off Type bar. You may select from Physician, Pharmacy, or Clinic. FAVOURITES: Locations you have added to Favourites from the Add Drop Off screen will appear on this page. Tapping on a favourite location will pre-load that location’s data into the following screen. To remove a favourite, swipe it to the left, and tap the Remove button. 2. SEARCH: For the fastest search results, users should type the first name, followed by last name, and avoid using commas if searching on multiple identifiers such as name and address. 3. {{ type }} Drop off Date: Today’s date is selected by default. To change the date, tap on the Select Drop Off Date bar. {{ TYPE }} PROVINCE: Tap the select Province bar and choose the province in which the drop off is located. Tap OK to continue. {{ TYPE }} ADDRESS: Tap on the Search (Physician, Pharmacy, Clinic) Location bar and begin typing to search for existing locations. Tap on the desired location within the list to select it. CREATING A FAVOURITE LOCATION: Once the desired location name appears in the Location field, tap the star icon to save that location to your favourites list. ADDING A NEW LOCATION: If the desired location does not exist in the list, tap the Add New Location button to add it. Once the desired location appears in the Location field, tap Add Packet(s) to continue. 4. ADD PACKETS: Review the information on this screen to ensure that it is correct. If you need to make corrections, tap the back arrow in the header to return to the previous screen. When you have confirmed the location information is correct, tap the Scan Packet button to access your device’s scanner functionality or tap Manually Enter if you wish to enter the packet(s) manually without using your device to scan. PACKETS LIST: Packets you have added (either by scanning or adding manually) will appear in the Packets List at the bottom of this screen. When you have added all desired packets for this session, tap the Submit button to submit the list. 5. MANUALLY ADDING PACKET(S): Tap on the Enter Packet Number field to open you device’s keypad and manually enter a packet code. Tap the Enter Packet button to continue. PACKETS LIST: Packets you have added manually will appear in the Packets list at the bottom of this screen. When you have added all desired packets for this session, tap the Done Adding button to add the list of packets to the queue and return to the previous screen. PACKET HISTORY: A history of submitted packets appears in this list. Tap on any item in the list to view details about that packet. The icon on the left of each packet item indicates its status. Processing Error Accepted To return to the Packet History list at any time, click the History icon in the bottom tab bar.
What's New
Version 1.5 2017-08-11
This app has been updated by Apple to display the Apple Watch app icon. Technical Analysis
Package Overview Basic metadata
Bundle ID
com.smartsti.dsMobile Current Version 1.5
Minimum iOS 9.0
Package Size Latest Recorded Package Size
Package Metadata 1 / 1 version records
Detailed binary, privacy manifest, framework, and Info.plist results have not been indexed for this package yet. The verified App Store and archive metadata above remains available.
Developer Information
Known Version Records
1 version record with stored package metadata
Stored metadata does not guarantee a package is currently available to download.
| Details | Version / IDs | Version date | Action |
|---|---|---|---|
 20.5 MB | v1.5 App Store ID: 841738450Build: 3 | 2021-04-22 00:29:04 | Get Version |